Target Audience (Who this course is for)
This advanced course is designed for:Graduates of Term 1: Students who know how to make a dummy book and storyboard, but now need to create high-quality final art.
Illustrators with consistency problems: Artists who have started books before but struggle to keep their characters and style looking the same from page 1 to page 32.
Fine Artists and Painters: Artists who are great at making single, standalone paintings, but find it hard to keep their energy and style consistent across a whole book project.
Freelance Illustrators: Artists who want to build a strong, professional portfolio to attract high-level publishers or literary agents.
Prerequisites (What you need before starting)
To join this course, you must already have:Completed Term 1: You must know how to make a storyboard, design a character, and build a dummy book.
Medium Proficiency: You must already know how to use your art tools (like watercolor, gouache, or digital software like Procreate/Photoshop). This class will not teach you how to paint; it will teach you how to use your skills to finish a book.
A Ready Story: You must come to the first class with a children’s story text ready to illustrate.
Added Point — Basic Coloring Skills: You should already understand basic color theory so we can focus on building advanced color palettes for your book.
Expected Learning Outcomes (What you will learn to do)
By the end of this course, you will be able to:Do a «Style Test»: Learn how to draw the same scene in 3 different styles to figure out which one works best for your story before you commit to the whole book.
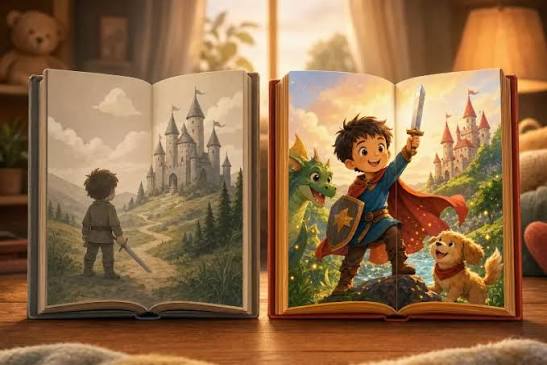
Create a «Style Sheet»: Make a personal rulebook for your book that includes your exact color palette, textures, and character turns, so you never draw them incorrectly.
Maintain Consistency: Keep your characters' faces, body types, and colors perfectly consistent across many pages, even weeks apart.
Finish a Full Project: Take a book project from rough sketches all the way to fully painted, final illustrations.
Use Advanced Techniques: Add special textures, mix different art supplies (mixed media), or use digital brushes to make your art look unique and professional.
Added Point — Manage Your Time: Learn how to break a big, scary project into small, manageable steps so you actually finish it.
Assessment and Control Elements (How we check your progress)
Because this is a long project, we check your progress in steps:Milestone Reviews: You cannot move to the next step until the teacher approves your current step. (For example, you cannot start final painting until your style sheet and sketches are approved).
Consistency Checks: The teacher will randomly compare your first illustration with your latest one to make sure your style hasn’t drifted or changed halfway through the book.
Advanced Critiques: Feedback will focus less on «does this tell the story?» (we learned that in Term 1) and more on «is this style professional?» and «does the art look beautiful and consistent?»
Final Rubric: Your final project is graded on: 1) Uniqueness of style, 2) Consistency across all pages, 3) Technical painting skill, and 4) Files being correctly ready for print.
Added Point — Progress Tracking: You will keep a log of how many hours you spend on each illustration to learn how to price your work for clients in the future.
Final Output/Result (What you will take away)
At the end of this term, you will have professional, real-world results:A Complete, Print-Ready Book: Fully finished, high-resolution illustrations for an entire children’s book (or a very large, polished portion of it), with files correctly set up for a printing press.
A Professional Style Sheet: A beautiful document showing your characters, colors, and textures. Publishers look for this to see if you can handle big projects.
Added Point — A Commercial Portfolio: A cleaned-up, professional portfolio website or PDF specifically designed to send to children’s book publishers to get hired.
Approximate Syllabus (8-Week Course Plan)
This is the week-by-week plan for creating your project:Week 1: Finding Your Visual Style
Looking at the current children’s book market and popular styles.
How to choose a style you love that publishers will also buy.
Added Point: Avoiding common style mistakes (like making art too messy or too complicated for small kids).
Week 2: The Style Test (Pilot Illustration)
Picking the most important scene in your story.
Drawing that one scene in 2 or 3 different styles/mediums.
Class critique to pick the winning style for the rest of the book.
Week 3: Building the Style Sheet
Locking in your final color palette.
Drawing your main character from the front, side, and back (turnaround).
Testing lighting and textures. This is your roadmap so you don’t get lost later.
Week 4: Tight Sketches & Layout
Translating your rough storyboard into very detailed, clean sketches for every page.
Making sure the composition (where things are placed) works perfectly with where the text will go.
Week 5: Final Art — The Heavy Lifting (Part 1)
Starting the final painting/rendering process.
Tips for staying motivated and not getting bored when working on a long project.
Working on the first half of the book’s illustrations.
Week 6: Final Art — Advanced Techniques (Part 2)
Finishing the second half of the book.
How to add special details, textures, and lighting to make your art «pop» off the page.
Added Point: How to fix mistakes digitally without having to redraw the whole picture.
Week 7: Designing the Cover
The cover is the most important illustration! It sells the book.
How to make a cover that grabs attention on a bookstore shelf but still matches the inside pages.
Week 8: Polish and Prepress (Getting it Ready for Print)
Final check for consistency and mistakes.
Understanding print rules: CMYK colors, 300 DPI resolution, and «Bleed» (extra space for the paper cutter).
Final Class: Celebrating and presenting your fully finished, professional children’s book!